JHipster API 网关
JHipster 可以用来创建 API 网关应用。一个网关应用是一个普通的 JHipster 应用, 所以你可以使用常规的 JHipster 选项及一些开发在这类应用上, 同时它还扮演者微服务入口的角色。举例来说,它能提供 HTTP 路由、负载均衡、quality of service、安全、以及 所有微服务的 API 文档。
摘要
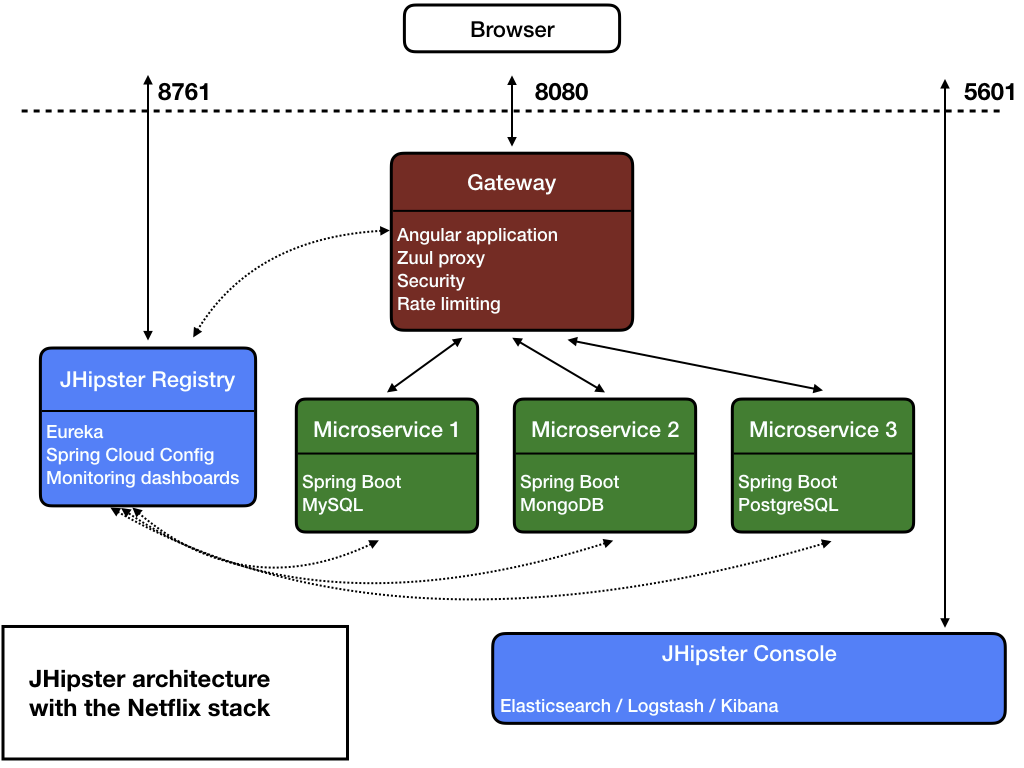
架构图
HTTP 请求路由网关
当网关和微服务启动时,他们会将自己注册到注册中心上去(在 src/main/resources/config/application.yml 文件中配置 eureka.client.serviceUrl.defaultZone 参数)。
网关会自动代理所有请求到各微服务,以这些微服务的名字:比如,微服务 app1 注册后,他在网关上的 /app1 可供调用。
举例来说,如果你的网关运行在 localhost:8080,你可以通过 http://localhost:8080/app1/rest/foos 来访问微服务 app1 的 foos 资源。如果你在浏览器中这么做,别忘记 REST 的资源还被 JHipster 做了安全防护,所以你还需要发送正确的 JWT 头(参考下面的安全章节说明) ,或者从微服务 MicroserviceSecurityConfiguration 的类中去掉安全防护.
如果存在多个相同的服务运行,网关会从注册中心中或得到这些实例,并且:
- 使用 Netflix Ribbon 进行负载均衡(分流)。
- 使用 Netflix Hystrix 做熔断器(断路器),失效的实例可以很快被安全移除。
每一个网关程序都有一个 “admin > gateway” 菜单,在那里可以监控开启的 HTTP 路由和微服务实例。
安全
Standard JHipster security options are detailed on this security documentation page. However, securing a microservice architecture has some specific tunings and options, which are detailed here.
JWT (JSON Web Token)
JWT (JSON Web Token) 是一种标准,具有简单易用的方法来防护微服务应用。
JHipster 使用 JJWT library,由 Okta 公司(译注:Matt 的现就职公司,关注于安全框架)提供,来实现 JWT。
令牌(Tokens)由网关程序创建,然后发送到下层的微服务:由于他们共享一个公共的秘钥(secret key),微服务可以验证该令牌,并对使用改令牌的用户进行认证(鉴权)。
这些令牌都是 self-sufficient 的:他们具有认证和授权信息,微服务不需要查询数据库或外部系统。这对于一个可扩展的架构非常重要。
为了使安全机制工作,JWT 秘钥需要在各应用中共享。
- 对于每一个应用,默认的令牌都是唯一的,由 JHipster 创建。存储在
.yo-rc.json文件里。(译注:jwtSecretKey 配置) - 可以在配置文件
src/main/resources/config/application.yml中设置令牌在配置jhipster.security.authentication.jwt.secret上。 - 为了共享这个配置到各应用,复制网关程序中的这个配置到各微服务程序中,或者通过 JHipster Registry 的 Spring Config Server(配置中心)共享。 or JHipster’s specific configuration of the Consul K/V store. This is one of the main reasons why people use those central configuration servers.
- 一个好的经验是在开发和生产环境中使用不同的 key。
OpenID Connect
JHipster provides OpenID Connect support, as detailed in our OpenID Connect documentation.
When selecting this option, you will use Keycloak by default, and you will probably want to run your complete microservice architecture using Docker Compose: be sure to read our Docker Compose documentation, and configure correctly your /etc/hosts for Keycloak.
When using OpenID Connect, the JHipster gateway will send OAuth2 tokens to microservices, which will accept those tokens as they are also connected to Keycloak.
Unlike JWT, those tokens are not self-sufficient, and should be stateful, which causes 2 main issues:
- A performance issue in microservices: as it is very common to look for the current user’s security information (otherwise we wouldn’t be using any security option from the beginning), each microservice will call the OpenID Connect server to get that data. So in a normal setup, those calls will be made by each microservice, each time they get a request, and this will quickly cause a performance issue.
- If you have selected a caching option (here is the “Using a cache” documentation) when generating your JHipster microservice, a specific
CachedUserInfoTokenServicesSpring Bean will be generated, which will cache those calls. When properly tuned, this will remove the performance issue. - If you want more information on this “user info” request, it is configured using the standard Spring Boot configuration key
security.oauth2.resource.userInfoUriin yoursrc/main/resources/application.ymlconfiguration file.
- If you have selected a caching option (here is the “Using a cache” documentation) when generating your JHipster microservice, a specific
- Authentication is not automatically synchronized between the application and Keycloak. Please note that this the standard OpenID Connect workflow, and that we expect to do some specific improvements in JHipster on this matter. As a result:
- When a user logs out of the application, he will be automatically logged in again if he refreshes his browser: this is because he is still logged in Keycloak, which provides automatic authentication.
- When a user’s session is invalidated in Keycloak, if the user is already logged into the application, he will still be able to use the application for a while. This is because OpenID Connect is a stateful mechanism, and the application doesn’t know immediately that the session has been invalidated.
JHipster UAA
JHipster 提供了一种创建 “UAA” (User Account and Authentication,用户账户和认证) 服务程序的方式,基于 Spring Security。该服务提供 OAuth2 令牌来防护网关程序。
你可以在 JHipster UAA documentation 章节找到所有和 UAA 相关的信息。
还有,网关程序使用 Spring Security 的实现来发送 JWT 令牌给微服务程序, so this works basically the same as with the JWT configuration detailed above.
自动生成文档
网关程序还提供他 proxifies 的服务的 Swagger API 定义,所以你可以得到相关很多工具的支持,比如 Swagger UI 和 swagger-codegen。
在网关程序的 “admin > API” 菜单下面有一个下拉列表,列出了网关的 API 以及所有微服务的 API。
在该列表中,所有的微服务 API 文档都自动创建好了,并且可以在网关程序中测试。
当使用了安全包含的 API,安全令牌会被自动加到 Swagger UI 的接口中,所有的请求就可以 work out-of-the-box.
限速
这个是高级特性,使用 Bucket4j 和 Hazelcast 来提供微服务的 quality of service。
网关可以提供限速功能,REST 请求的数量可以被限制为:
- 根据 IP 地址 (匿名用户)
- 根据用户登入 (登入用户)
JHipster 使用 Bucket4j 和 Hazelcast 来计算请求次数,并且会在达到限制时发送 HTTP 429 (请求过多)。默认的限制是每个用户每小时 100,000 次 API 调用。
这是个重要的特性,来保护微服务架构不被用户的请求攻击。
由于网关程序保护了所有的 REST 端点,它具有用户权限的所有访问权,所以它可以很容易的扩展来提供特定的关于用户角色的限速功能。
要使用该限速共,在 application-dev.yml 或 application-prod.yml 文件中设置 enabled 参数为 true:
jhipster:
    gateway:
        rate-limiting:
            enabled: true
数据存储在 Hazelcast 中,所以可以扩展网关,只要 Hazelcast 分布式的缓存配置好,这是开箱即用的功能:
- 所有的网关,默认配置使用 Hazelcast
- 如果使用 JHipster Registry,所有的网关实例都会自动将它们自己注册到分布式缓存中去
如果你还想加入更多的规则,或者修改现有的规则,可以在 RateLimitingFilter 类中修改。一些常见的修改:
- 降低 HTTP 调用的限制
- 增加每天或每分钟的限制
- 取消管理员用户的所有限制
访问控制策略
默认情况下,所有的微服务都通过网关程序访问。如果你希望一些 API 不要从网关中访问,可以设置网关的访问控制策略来过滤。可以修改 application-*.yml 文件中的 jhipster.gateway.authorized-microservices-endpoints 配置:
jhipster:
    gateway:
        authorized-microservices-endpoints: # Access Control Policy, if left empty for a route, all endpoints will be accessible
            app1: /api,/v2/api-docs # recommended dev configuration
例如,你只希望开放微服务 bar 的 /api/foo 端点:
jhipster:
    gateway:
        authorized-microservices-endpoints:
            bar: /api/foo